Showing posts with label Handmade. Show all posts

Wednesday, August 17, 2016

Handphone Wallet- The Upgraded Version

I guess this is the first entry for this year.. Dah laamaa sangat tnggal dunia blogging ni. tetiba rasa rindu laks...kekekeke

Anyway, saja nak citer... Bulan Ramadhan hari tu terpk nak buat simple pouch utk duit raya, even ada yg share camana nak buat, punyalah bersemanagat nak buat jugak, tapi xder rezeki sebab, abah kat kg jatuh sakit. So abang balik kg, jemput abah datang ke sini, dan berkampungla kami kat KPJ kajang for few days b4 dia berkampung kat my house.. So banyak kerja2 jahit (banyaklah sangat) yg tertunggak.. Nasib baik baju raya siap jahit...

Since dah lepas raya kan, so mood nak jahit pouch utk duit raya tu nak hilang la, tiba2 teringat nak buatkan wallet utk hp ni... teringat la my first hp wallet yg pernah buat 6 tahun yg lepas... Tak sanggup eden nak letak sini, buruk giler rasanya, so kalau terasa nak tgk jugak, korang klik jelah kat link tu...Tapi apapun itulah kenangan pahit manis dan pelbagai rasa yg saya ada, One of my first products diawal pembabitan dalam bidang handmades... Takde specific pattern pakai main hentam kromo jer.... Sadly, until recently baru tergerak hati nak redo balik, sebabnya seriau skit tag ketebalan esp kat card slots... Tapi tulah ramai benau rakan-rakan handmades yg membakar hati dan perasaan dengan menunjukkan gmbr2 products mereka dan tak lupa utk memberi semangat, then slowly cuba jugak buat balik satu.

Memang slowly betul la progressnya, and finally berjaya jugak menghasilkan prototype the upgraded version, tapi still ada 1 2 tempat yg nak kena betulkan, but overall puas hati la jugak.. Again still no specific pattern, pakai main agak-agak jer sesambil mengaplikasikan sedikit ilmu yg ada.

And finally...tadaaaaa....
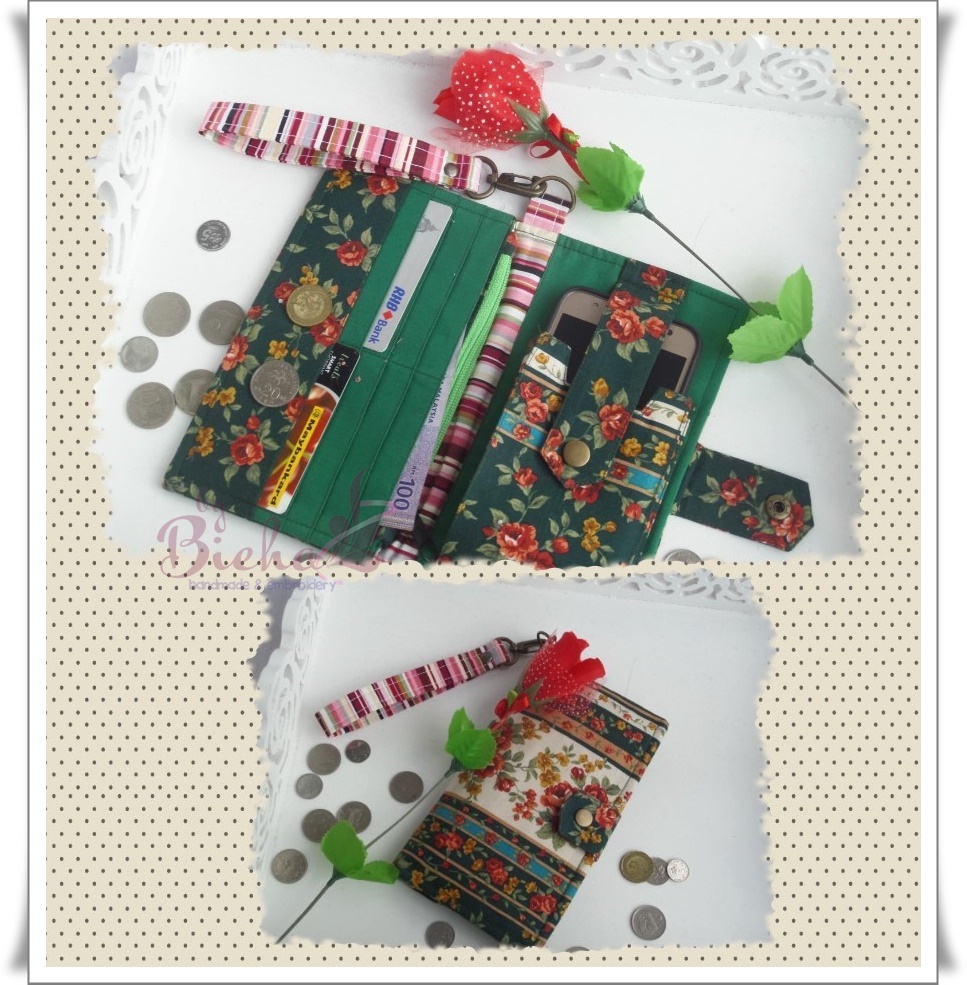
 Xde la cun sangat, tapi at least beter then the last one la...kan..kan..kan

Insyaallah will make the readystock soon and please pray with me that I'll come out with more soon..

Thanks all kerana sudi membaca.... Muah ciket.

Saturday, September 19, 2015

Love Those Personalised Tags

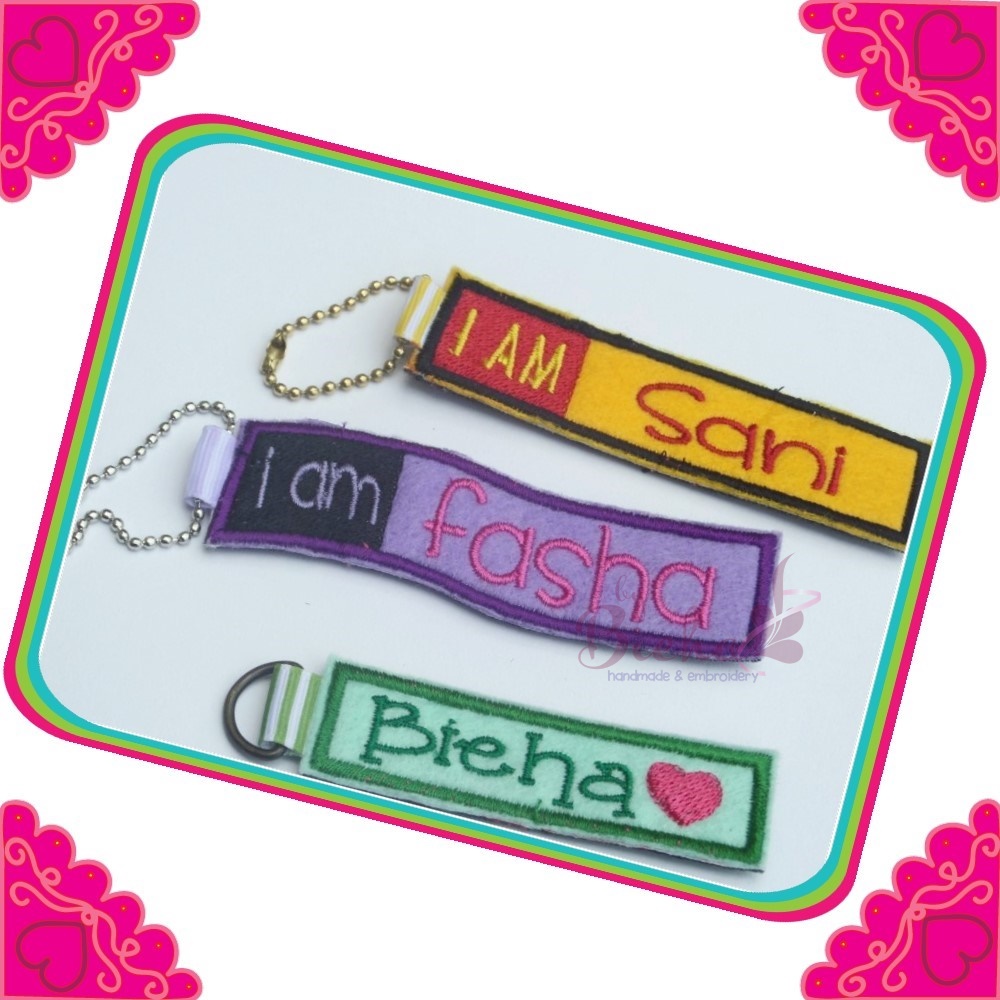
Hi, I'm back!!! Now with personalised tags/keychains. You can customise to your own simple wording (spaces and characters are limited though)

Below are few examples of the tags...


 2 sizes are available..However you can req to customised your own size, but price may be vary..


Love & Regards

Wednesday, May 27, 2015

Handmade Label?

All the while, I just sell the iron on heat transfer papers. Then later, some of my customers requested for me to make the labels for them, as some they don't know how to go about it and some they don't have enough time to do it themselves. But since I myself have some limitations especially in terms of time and proper equipment, I only managed to help them out up to designing (simple one) and printing. Cutting and ironing part, they still have to do it themselves. Alhamdulillah they are happy with it.

So below are some of the examples of the labels I made for my customers. Some for their product labels, and some for their kids cloth labels.

For Labelling Kids Clothing In Boarding Schools

Also For The Kids

Product Labels

For Baby & Clothing Products
Orders are still welcomed, but as I mentioned earlier, it will only up to printing, until I managed to get the proper equipment. Blank papers also are still available.

For orders, kindly leave me your email address at below comment, or you can also What'sApp/Telegram me at 0133949203. No phone calls please.


Love & Regards

Tuesday, May 26, 2015

Cute Diaper Stacker

At times I love to challenge myself, taking orders from customers for things I never done before.

Diaper stacker was in my To Do list for quite sometime, but I didn't seem to find a time to actually do it, until my customer asked me whether I can make one for her baby. Jumped at every opportunity, I just said yes, without having a clue on how to do it.... 

Thanks to the technology, I surfed the internet looking for a tutorial, found some but as usual, to make it a little different from others, I combined few steps, and add some of my own ideas.

.

My First Diaper Stacker
So here it is, it might look similar to others, but there's a few features I added to it.
The Inside
It's fully lined in the inside, and with HIDDEN hard based, so the stacker has sturdier based, and it is REMOVABLE too for easy cleaning.


Buttoned Strap & Attractive Personalisation
With buttoned strap so you can either hang it over the hook, or attach it to the cot. Not to mention attractive embroidery personalisation.

The size of this diaper stacker is 22"H x 12"W x 6"D. However, if you have different measurement in mind, Insyaallah we will be able to cater for that as well.

Orders are absolutely welcomed, so drop me an email or simply leave your message below with your contact details...

Have a great school holidays ahead..


Love & Regards

Monday, April 7, 2014

For the Apple of Her Eyes

This set of bags was ordered by a customer for her one and only lovely daughter. A large size tote bag and a big pouch.

Lovely, aren't they?

Alhamdulillah, both mum and daughter love them very much.

Need something special for your loved ones?

Love & Regards

Thursday, February 13, 2014

For 3 Lovely Daughters

Mother's love for the three daughters...

A set of tote bag with matching boxy pencil case, personalised with names on each.


And the girls love them....


Love & Regards

Thursday, June 14, 2012

Personalised Boxy Pencil Case

A quick update... Personalised boxy pencil case... A great gift for your kids... The size can be customised to your needs so it can be cosmetic pouch or a pouch for your lappie's cable or whatever you wish to use it for...
For the 3Fs
Orders are welcome...

Love & Regards

Friday, May 18, 2012

Simple Messenger Bag

Semalam sempat siapkan Messenger Bag  ni.. Memang simpel, tanpa poket just with little embroidery motif. Sesuai sangat untuk dihadiahkan buat anak-anak utk dibawa ke kelas agama, kelas tuisyen dan jalan-jalan or even for laptop/netbook.

Size: 11" x  9" x 2"
Customised orders are also welcome. You can request your own size, add more compartments/pockets, personalised it with cute embroidery motifs and/or names, other embellishments and etc. The price will depends on the type of materials used, size, embellishments   and other extras. Great gift for your kids or friends or even YOURSELF, hehehhe :)...

Love & Regards

Monday, May 14, 2012

Flower Girls Dress

In addition of hectic week, was a wedding for my husband's niece. Since my 3Fs are among the 'little' ones in the family, so she asked them to become the flower girls and gave me the clothes for the dress.. I never sew any dress before let alone the kid dress so for 3Fs' dresses, it was a 'hentam sajalah'.... And the verdict is.....

Princess Line Dress with Embroidery motifs
With Other Flower Girls

Awaiting for the Groom
In Action
I think 'ok'lah for first timer, and the important thing is my hubby complimented on the dress (and adding "Lepas ni tak payah beli baju lagi dah, Mama boleh buat sendiri, lagi cantik..."...huhuhuhu, no more shopping la yea?.. But at least I can shop for more 'kain'...du'uh!!) and the girls also love the dress and whenever they wore it they'll imagine as they are a beautiful princess...hhahaha

Will try to sew few more for the girls and hopefully I can also take some orders as well...

Love & Regards

Monday, November 21, 2011

Embroided Small Pouch

Schools holiday's finally here. So first of all, I would like to thanks all the teachers that had taught my precious daughters, Fasha & Filza... So as a token of appreciation, I made a small pouch with some embroidery motifs on it for each of the teahcers... Really hope they love it..

First batch - The One Side

The Embroided Side
2nd Batch

For 3 More Teachers

There si 3rd batch for the pouches but haven't done the editing yet... Will upload here once they're ready...
Anyway, it also open for ordering... DO let me know ir you're interested...TQ

Love & Regards

Thursday, June 30, 2011

Fabric Flower and Fabric Button

Just a short entry. Today I'm going to show you the kanzashi flower I made last night. This is a fabric flower with fabric button. It was my first trial, so there's few more rooms for improvement...hehhehe... Anyway, the first lesson I've learnt was to choose the correct type of fabric. I think it's best to use medium to heavy fabric (not too heavy though - heavy cotton shud do), or felt, as long as not too 'soft' otherwise, the flower won't turn out that nice... The other option is either to 'starch' the fabric first or by using interfacing if you want to use the lighter fabric. So enjoy 'washing your eyes' (cuci mata...) hehehhehe...

Ignore the irregularities...hehhehe
By the way, I also wanted to show you the hair clip I made last weekend.
Errkk... since when does this tree have flowers?


Love & Regards

Wednesday, June 29, 2011

Fabric Button For Sale

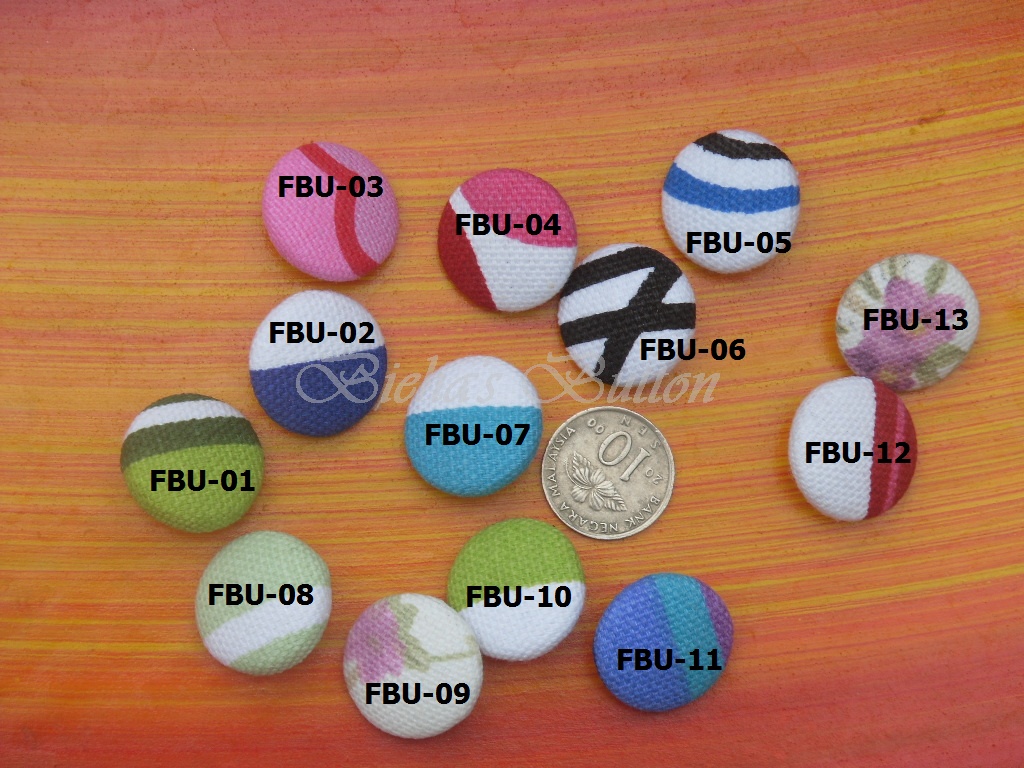
I managed to 'make' some fabric buttons available for sales... Here are some of the collections. Many more are coming....

Random Collection
 Few ready stocks are available for each 'pattern'.

Exclusive Collection
 Limited stock for each pattern, depends on the availability of the fabric, because it only used certain part of fabric only.

Unique Collection
 The fabric is taken at random and yet selected part to create the unique pattern. Can request for similar pattern, but won't be 100% the same, and also depends on the availability of the fabric.

Plain Collection
Other colours also available. Please do not hesitate to ask for the available colours.

These fabric buttons are also available in brooch form. If you're interested, please feel free to fill in the order form or email me., and indicate whether u want it as button itself or as brooch.

Love & Regards

Friday, June 24, 2011

DIY - Fabric Button Brooch

Ok, today I'm going to show you how to turn the fabric button into brooch... Some of you might know how to do it already, but it's ok, I still want to share it with you....heheheheh

First of all I want to show you the different outcomes of these fabric buttons from using the press machine or done manually/using tool kit. Blue Button (BB) was by press machine while Red Button (RB) was done by manual kit.
Front view, notice BB is flattened

Can you see the 'grip' effect on BB?
When using the press machine, the button is nicely attached while if you're using manually it won't fit nicely and you have to use stronghold glue to help the bottom hold to it's cap. Anyhow, either way don't let it stop you from making the masterpiece of your own.....heheheh..

Ok now, let's go to the tutorial.. It simply straight forward, so if you have any question please do not hesitate to let me know, ok....
Plastic bottom
 The good thing that this bottom cap is made from plastic is because you can have the shank removed if you don't want it.

Remove the shank
 Please ensure you use both hands while removing the shank... I didn't have cameraperson available so had to pose with one hand....hehhehehe

After the removal of the shank
 Trim any sharp and unneccessary edges.

Putting the glue
 You can use any stronghold glue or hot glue and put it on the pin brooch cap. If you're using the hot glue, be careful that the brooch cap might get hot.

Attached firmly
 Attached it to the fabric button and press firmly and you're done.. Clean off any glue residue..

Done!!!

Front View
Pretty easy yeah? Excited to try it on but don't know where to find the fabric button? Don't worry, I'll be coming out with ready to use fabric buttons soon, so stay tune....

Love & Regards