Thursday, February 24, 2011

My First Handmade Long Wallet

Actually, it's quite a while I've been wanting a new wallet for myself. The current wallet that I'm using is actually from my wedding 'hantaran' which is more than 7 years back... 7 years old wallet and yet, it still in a great condition, I must say... But in a way, I'm longing for a new one, just for a change. However, since I'm no longer working, meaning no 'own money', so I need my hubby's 'courtasy' to buy me a new one. But, being a 'good' wife, I don't really have a heart to ask from him, so I'm saving a bit so I can afford it on my own...

As usual, when I think I saved enough for a new one, so off I went to JJ. There's few wallets that really caught my eyes, and the price was ranging between RM100-RM250. Although I have enough money, then it stroke my mind not to waste that money for something I don't really need. Well actually it always happened to me whenever I want to buy something for myself, even though at the time I was earning my own money.

So I decided to make 1 for myself. Only today, I made it happened.. So here's the preview, hehehheeh

The wallet
The Inside
I can't really give you the close up, this is experimental, so not really perfect...hehehhe.. Since this is my first attempt, so I decided to make it using the remnants...  This wallet containing 6 card slots, 2 slots for 'paper' money, and zippered pocket for coins... Since this is my first attempt, so I'm using velcro for the closure...

The result, not bad eh?...I guess so because well, before I finished sewing this wallet, it's already been booked!!! By who else if not by a 7 year old young lady in d'house.... She even asked how much I'm selling, and she's willing to pay for it!!! Right after I finished it, the other 2 young ladies also want one for themselves (well even almost 2 years old Faiqa also wanted 1 for herself).... And Fasha not wasting any of her time, declared hers, and started putting her 'stuffs' in...

So still no new wallet for me? hahahaha... It's ok, I'll be making a new one for me soon with some 'improvement'...

If anyone like to have one like that, just select your fabby and I'll sew it for you....

Tuesday, February 22, 2011

Those Curtain and Table Runner

Kali ni nak update my previous project, yang saya jahitkan untuk kawan. Langsir dan table runner. Actually 2 2 ni dah siap October last year, but because at the time, this blog does not exist yet, so cannot upload la in here... So jom cuci mata...

French Pleat
 Actually she gave me limited fabric, 1.5m with 60"wide. Memula dia tak tahu nak buat apa, then she asked me to make a curtain for her kitchen's window. So kain kiranya cukup2 jer..

The one side

The other side
Yang ni pulak table runner, also for the same owner. She will have 2 options either to use it the first side or the second side... This table runner supposed for her 6 seater dining table... At first, nak buat sampai hujung meja dan ada lebih skit so boleh letak tussel, but once again since the fabric given was also quite limited, so kalau nak potong pastu sambung2 nampak x cantik lak, so buat pendek skit tapi x leh letak tussel la...

Anyone interested? Okay, just let me know, Insyaallah I'll sew it for you....

Monday, February 21, 2011

Baby Binder (Barut).. The New Design

As I promised before, I'll be making a 'new' design of baby binder or known as barut... At the meantime, I'll call this barut as 'Barut 2 Dalam 1'... The name has no commercial value eh?.. Never mind la as long as it serves it's purpose...hehhehehe

So here are the snapshots:-

Features almost the same as the ordinary barut

Shorter outer layer

2 separate layers
Unlike ordinary barut that usually has 2 layers sewn together, this barut has 2 separate layers. The innner layer is mainly use to wrap the baby's tummy, and the shorter outer layer will serve to 'cover' the inner layer and bind the whole barut..

I would like to show you the step by step on how to use it, but since my youngest is nearly 2 years old, and I don't have any other little model, so for now I just describe briefly on how to use it, okay.  Actually, I already prepared few snapshots on how to use the binder using 'little bolster' as a 'model', but I found it quite funny, so forget it....

Sebenarnya cara nak pakai barut ni sama jer ngan barut biasa tu. Cuma memula tu, barut perut bayi anda dengan kepingan dalam dengan kejap dan kemas. Lepas tu barut pula dengan kepingan yang kedua, dan ikat.

Kenapa barut jenis ni? Pertama sekali advantagenya, adalah ianya lebih kejap dan kemas, dan tidak mudah ber'gerak'. Selalunya barut yang biasa tu, anda terpaksa betulkan beberapa kali, sebab ianya akan ternaik ke atas dada bayi, tapi dengan barut ni, jika dipakai dengan cara yang betul, anda mungkin tidak perlu atau kemungkinan untuk membetulkan kedudukan barut adalah minima.Dan semakin bayi anda membesar, jangan risau jika bahagian kepingan luar tidak lagi dapat menutup keseluruhan kepingan pertama, kerana fungsi utama kepingan kedua adalah untuk 'mengikat; barut tersebut, dan kepingan pertama masih lagi dapat membarut perut bayi anda dengan kejap dan kemas..

Untuk pertanyaan lebih lanjut dan untuk tempahan, bolehla hubungi saya samada melalui email atau feedback/order form. Hope to hear from you soon. Have a great day....


Friday, February 18, 2011

Selection of Fabrics (A Must Read)

Ok, akhirnya, berjaya jugak upload gambar2 fabrik yang ada kat sini. Ingatkan tak banyak, tapi bila dah buat gitu nampak banyak jugak... But these fabrics are NOT for sale. Only for you to choose if you want me to sew something for you...

Reason kenapa saya letak kat separate page is so it would be easier for the customer to choose. Besides, nak elakkan salah paham certain potential customers who thought I'm selling those fabrics.. So after this, I'll remove the fabrics photoes that I've posted at the sidebar.

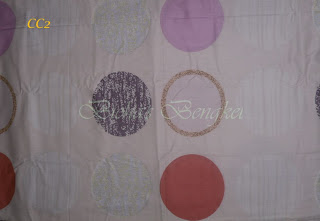
Lagi satu, bila memilih fabrik tu, make sure baca apa yg saya tulis for each category. Bukan apa, sekali lagi untuk elakkan salah faham, especially to those fabrics yang bidang besar, dan corak besar, contohnya:


Diameter untuk bulatan dalam fabrik di atas adalah lebih kurang 10cm. So kalau item yang diorder adalah kecik, so impossible la item tu boleh cover semua circle yang ada tu kan. Bukan apa, takut jugak kan, contohnya, customer pilih fabrik ni sebab suka kat bulat purple tu, tapi bila dah dapat item yg diorder, takde pun bulat purple tu kat item tu... Pastu mula la x puas hati, cakap saya menipu and so on... Tu yang saya taknak.. 

Customer boleh letak 'preference', tapi ianya tertakluk juga samada saya boleh cuba ambik kain in different way tanpa 'membazir' kain tersebut ke tak, kalau tak boleh and customer insisted, so I'm afraid they have to pay extra for it...

Anyway, saya harap takkan adalah isu2 yang berbangkit yang dirasakan tak perlu. Saya just letak kat sini awal2 supaya ianya menjadi peringatan buat kita semua. Walaupun tak pernah berlaku pada saya so far, tapi ini adalah berdasarkan pengalaman-pengalaman teman2 yang lain.

So feel free utk cuci mata, dlm kepala ni banyak sangat idea nak buat tapi belum terluah lagi...hehhehe...

Till then. Have a nice day.

Thursday, February 17, 2011

DP or DB?

Ni nak sambung balik pasal mesin buat hal hari tu... Actually, penyelesaian yang ada hari tu bukanlah penyelesaian yang sebenar...huhuuh... Sebab malam tu bila saya cuba balik, jahitannya ada kala ok ada kala melangkah, dan ada jugak selitan bunyi 'jentera berat' dan kekadang sangkut.. Sebenarnya saya dok agak, sb sebenar adalah jarum tu tak dapat nak masuk habis dalam shaft dia, tapi tu la masalahnya bila tolak masuk pun it just stuck there..
Tapi saya masih lagi tak puas hati, cuba punya cuba, 'jolok punya jolok' (sorry, mind my language..huhu), akhirnya dapat jugak masukkan habis jarum tu ke dalam shaftnya, and the problem's gone...

Mila, a good 'cyber' friend asked me what's the difference between DP and DB needles... Below are the needles.
Actually there's not much difference between the two actually, but as I mention earlier, jarum DB bahagian atasnya agak slim dan panjang berbanding DP yang agak 'gemuk' dan pendek, hehehe..... Panjang jarum agak sama, so sebab tu la saya buat experiment tu....heheeh... Tapi yang masih bermain di fikiran, apsal tiap kali tukar balik ke jarum DP, sure ada problem bila nak masukkan jarum tu balik?..Anyhow, lepas ni memang kena letak jarum DB tu jauh jauh....

Camana nak tahu mesin jahit tu kena guna jarum DB ke DP? Saya sendiri pun tak sure apa beza antara kedua jarum ni, apsal tak buat jer mesin yang guna jarum yang sama jer.. Well tu kena tanya manufacturer kot, tapi yang saya tahu, walaupun dari jenama yg sama tapi different model different pulak jenis jarumnya... Maybe ada sesapa yang arif baca ni boleh kot bagi komen. But don't worry, whenever you buy high speed machine, your salesperson will tell you which type of needle your machine is using....

Okayla, got to go now.. Till then....

Sunday, February 13, 2011

Bila Mesin Jahit Buat Hal!!!!

Mesin jahit buat hal?... Arrrggggsss... Tensionnya.... Ni sebenarnya kali ke 2 mesin high speed ni buat hal.... Disebabkan hal yg sama...huhuuh...

Alkisahnya, masa pertama kali ianya berlaku, dlm tahun lepas kot... Masa tu tengah dok sort balik perkakasan alatan jahit menjahit ni, lalu terjumpa la beberapa bilah jarum DB yang belum digunakan lagi. Actually jarum ni saya beli masa belajar menjahit dulu, so beli sebagai spare parts la, kot bila jarum kat tempat belajar tu patah ke bengkok ker... Tapi mesin high speed yg saya pakai guna jarum jenis DP... So bila telek- telek antara 2 jarum tu, macam tak nampak sangat apa bezanya cuma kalau x silap yg DB batangnya halus skit, whereas, yg DP gemuk skit..

So why not, buat experiment, mana tahu boleh guna, so tak delah membazir jarum DB tu (walaupun beli yang murah jer). Bila masukkan jarum tu dan jahit, to my amusement, boleh jer pakai... Tak ada masalah pun... So excited jugakla sb kiranya tak membazir la jarum tu... Tapi.... bila cuba balik convert ke jarum DP, maka bermulalah MASALAH!!!..huhuu... Yang paling ketara, mesin jadi cam berat, pastu macam timing antara benang atas ngan benang bawah dah lari, so bila jahit memang benang x lekat la...kalau lekat pun jahitan mcm melangkah.... Tu tak kira ngan bunyinya yang macam jentera berat jer...

Puas godek sana sini, still the same..Siap call technician dan bagi dia dengar bunyi mesin tu, dia pun suspen...Well apatah lagi saya... Tapi dia pulak tak dapat datang masa tu. besoknya baru dia free... Tapi saya pulak mcm x puas hati still dok godek sana sini.... Bila dah tension sangat, rehatkan diri kejap, then try lagi... Ntah macamana saya buat, akhirnya berjaya juga!!! Tapi saya pun tak ingat apa yg saya buat masa tuh...

Kali ni pulak, bila jarum yg sedia ada tu dah tumpul, nak tukarla ngan yang baru... Tetiba nampak ada satu jarum kat bekas jarum tu yang nampak ok, dan still tajam, so just masukkan aje... Tadi masa nak jahit, terasa mata dah tumpul (sebab sebelum tu terjahit benda yg keras), so tukarlah jarum tu... Dan kali ni benda yang sama jugak berlaku!!!!...Oh, tidakkkk!!!!!, Bila check balik, rupanya jarum saya tukar hari tu memang jarum DB pun.....waaarrrgghhhh!!!!....


Kali ni, cuba lagi jadi MacGyver.. Still x berhasil... Dah la tengah semangat ngan projek baru... Last2 ambik nafas panjang2 cuba skali lagi, dan ALhamdulillah berhasil!!!... So kali ni saya make sure masukkan entry kat dalam ni supaya bila ianya berlaku lagi, saya boleh search kat dlm ni to find the solution...

Rupanya ianya berpunca dari kedudukan jarum.. Actually jarum dah dipasang betul2 seperti dlm manual, tapi still x dpt, so kali ni saya sengetkan kedudukan 'groove' jarum tu.. Jahitan menjadik... Then saya cuba balik betulkan kedudukan jarum tu, hasilnya?.. Benang tak lekat pun, so bila sengetkan balik, ianya ok... Alhamdulillah sesangat... Tapi mood menjahit dah hilang, besides dah nak petang, anak2 pun dah sibuk mintak makanan petang so, bye bye la bengkel....

Malam ni kalau sempat, akan ku jengah balik bilik itu... and hopefully no more problem......See you soon....

Wednesday, February 9, 2011

Zippered Toaster Cover

Assalamualaikum sumer,
     It's been few days after my last posting. A bit 'buzy' after CNY....hehheheh... Anyway, I just finished with my latest creation, Zippered Toaster Cover.
     So before I babbling further, here's 'the look' of it.... Tadaaaaaaaaa!!!!


      Actually this is the experimental project. So bila menjadi tu excited la jugak eventhough my spirit nearly 'broken' when it came to attaching the zipper's slider, and attaching the 2 parts (above & bottom) together... But I'm glad I DID IT!!!! The material I used for this cover is cotton, but the inside is using the high quality waterproof material.

      Why the zippered cover instead of 'ordinary' cover? Well, the ordinary cover usually only covers the top and body parts, leaving the bottom parts 'exposed'. So meaning, you can cover your toaster from dirt, dust or even grease, but the 'creepy crawlies' ie roaches and lizards, still will be able to sneak inside your toaster and 'partying' inside and leave their 'marks' behind without you realizing it.. So the next morning, you open your toaster cover, and with great of confidence, put your slices of bread and toast them, together with those 'extras'.... yaikksssss!!!! That's why I came out with this idea, 'total coverage' for your toaster!!!...

     Like it?? Love it?? Would like to have one? I'm open for your order.... The price will depends on the materials chosed. I will be updating the new materials soon, including heavy cotton, and other types of cotton.

WARNING: Please ensure that your toaster is totally cool down before putting on the cover!!!